
A few months ago I welcomed a Brother Scan N Cut machine into my studio after many months researching it's capabilities. As I sit here now I have to ask myself why did I wait so long. I was reading the reviews, watching YouTube videos but I had never actually seen one working in person. I was lead to believe that it could do what I wanted it for but it just seemed too easy so I thought that there had to be a catch. Well, after having it here for a couple of months I can say that there is no catch. It is a tool that I use in my studio nearly every day, yes every day.
My poor husband has spent many, many hours hand cutting my EPP shapes for new designs.
My Tenderness Quilt was made entirely from papers that he hand cut for me!

I knew that there just had to be a better way, especially for shapes that did not exist - yet :)
Over the course of time I plan on sharing some Tutorials for the Scan N Cut with you and with that said it seems like a Basic "Getting started tutorial' is the best place to start.

When you unbox your Scan N Cut machine, set it up as per the Manuals instructions and turn it on.
One of the first things you need to do is press the little wrench button to access the settings and change the measurement units to inches.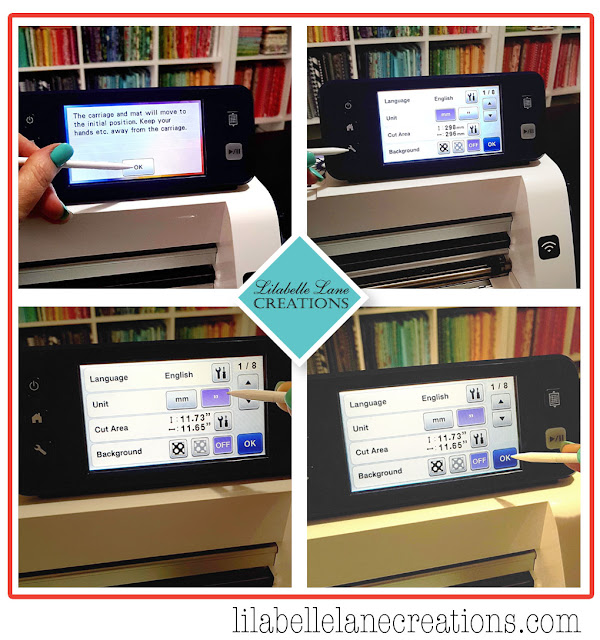


Select a pattern and scroll through the options.
For the purpose of this tutorial I am selecting the Clamshell.
Use the + and - to select your size. As you change your height the machine will automatically change the width for you keeping your shape in proportion.

You can then select the quantity that you require. In this example, 14.
It is also so easy to move a shape on the screen. You just touch the shape with your stylus and drag it to where you want it.

When you are happy with the positioning the shapes you click OK and then the cut button. The machine will give you an estimate of the cut time (2 minutes is shown here). I have timed this machine many times and I have to say it hardly ever takes as long as it says to cut.

Lay your paper (I use a 200 - 220gsm paper, available at any good Office supplies store) onto your selected cutting mat as per the manuals instructions. Also ensure that you have your blade setting and pressure setting selected correctly. Refer to your manual if you are unsure. Position your mat ready to be loaded into the machine and press the load button.

When your mat is loaded correctly the start button goes green. Press the start button and let your Scan N Cut work its magic. When it has finished cutting press the OK button. Remove the cutting mat from your machine by pressing the load button again.

Peel back the paper and remove your freshly cut shapes.
You can repeat the process and cut as many shapes as you require.
If you are cutting more of the same shape you only need to place more paper on your mat, reload and hit the cut button again.
Happy stitching,
Sharon x


My Tenderness Quilt, Bejewelled Cushions and my Stargazer Quilt patterns
are all Scan N Cut friendly.
Disclaimer.
"Brother Australia are supporters of Lilabelle Lane Creations.
All opinions expresses are my own and are not influenced in any way by a third party."
You can also follow Lilabelle Lane Creations here


Thankyou for the tutorial. After seeing your post on IG I've been thinking of getting a scan & cut & wondered if it would be worth my while. Now seeing this i'm thinking it might be a good investment. Hugs, xx
ReplyDeleteWow. This is the most interesting way to have own English paper piecing. Thanks for sharing a good guide and tutorial as well.
ReplyDeleteEmma Charlotte | Affordable-Dissertation.co.uk
Thank you for this informative tutorial and review.
ReplyDeleteNice
ReplyDeleteThanks for the tutorial. I just purchased my scan and cut today and will use your tutorial to set up. I look forward to any other tutes you provide and am waiting for your new book to arrive so I can get started.
ReplyDeleteJust brought my scan and cut and will set it up today using your tutorial. Look forward to any further tutorials you provide. Also my copy of your book on EPP has just arrived and I'm loving it. Will start with some of the smaller projects first.
ReplyDelete